In 1977, Lego introduced a completely new product line in Europe, under the name of “Technical Set”, which, thanks to the new bricks, made it possible to build functional models never before seen. This line was finally renamed to “Technic” in 1984.
From the first 4 Technical Set, the biggest (meaning the dimensions of the finished model, and also counting the bricks) was set 853 - “Auto Chassis” started the “Supercar” series.

The history of Technic
Despite the name "Technic" appeared on the boxes only in 1984, “Technical Sets” are considered to be Technic as well. Apparently it’s not quite straight forward, which sets are Technic and which ones are not.
If viewed strictly, only those sets are Technic which have the word “Technic” written on their box, but this would exclude “Technical Sets”, while they are having every key feature of a Technic set: having the very same set of bricks and featuring models with actually working functions.
If viewed differently, then everything could be Technic which consists of Technic bricks. This is worse, as a lot of Technic sets consists System bricks and a lot of System sets consists some Technic bricks.
Are Mindstorms or Bionicle considered Technic? Bionicle is derived from Technic, but then got it’s on product line and even be bricks became quite different. Mindstorms sets are made of Technic bricks except for the electronics, but in truth it is a different product line as well.
I'm with the majority in this matter: I consider "Technical set" to be Technic, but not Bionicle (not even those Bionicle sets which were released before the "Bionicle" brand came along).
What lead to the introduction of the “Technical Set”, was there any prelude to it?
Before Technical Set
The first Lego gear of any kind was introduced back in 1965, with the set 001. (Though the number suggesting that it was the first Lego set ever, that’s not the case. It was the first to feature gears, though)
I’d like to show how early we are in the history of Lego: The Lego Company switched from cellulose acetate to ABS plastic (which is a more stable and robust material) only 2 years before introducing the first set with gears in it. The company still produced non-assembly plastic cars up until the late 60-es. These were comparable to Hotwheels or Matchbox cars but with a sale of 1:87, and made of plastic, instead of die cast, and featured no studs at all, to build Lego bricks on them.
Also there is almost 10 years to go to the release of the iconic Lego mini-figure.
The set 001 was only released in North America: the renowned bag and suitcase manufacturer, Samsonite produced it under a Lego license. These gears are not compatible with the later Technic ones, as they are much bigger, and having different teeth profiles. They also featured studs on their surface to mount them on wheels, because back then, there were no axles with an X shaped cross section. The European version of the gears were released in 1970, which were very similar to the North American ones in appearance, but were not fully compatible, as the teeth profile was slightly different.


The smaller yellow gear is a Samsonite one, while the others are all European version (they all have an X shaped hole in the middle). As it is clearly seen, the teeth are cannot be perfectly aligned.
The axles were first released in the set numbered 800, along with the European version of the gears: these were the first gears made to be able to mount on an axle, but at the same time they also lost the studs. As far as I know, the European market never got any of 001 sets and the US never got any 800. The only country to have both type of gears was Canada.
There were no beams featuring holes before the first Technical Set. These early gear sets included 2x4 bricks with holes in them, for mounting the axles. As far as I know, there were no other size. The first universal joint was released in 1972, in the set 803.
It’s rather interesting to see, why these early gears were so big: there are exactly one stud worth of spave between each tooth, so any brick could be used as a gear rack.
Supercar
In truth, “Supercar” was never an official sub-theme of Technic, and that makes it debatable which sets are considered a supercar. In general, supercars were always the pinnacle of Technic Lego, featuring the most complex functions and newest innovation of their time. Also there were 2 sets which actually bore the name “supercar”: 8880, and 8070. 853 though is definitely a supercar, in a way it's the great grandfather of the 42083 Bugatti Chiron.
853 Auto Chassis - the very first supercar
Released: 1977
Set number: 853 (in Europe)
Set number: 956 (in North America)
Set name: Auto Chassis
Number of elements: 602 (according to bricklink.com)
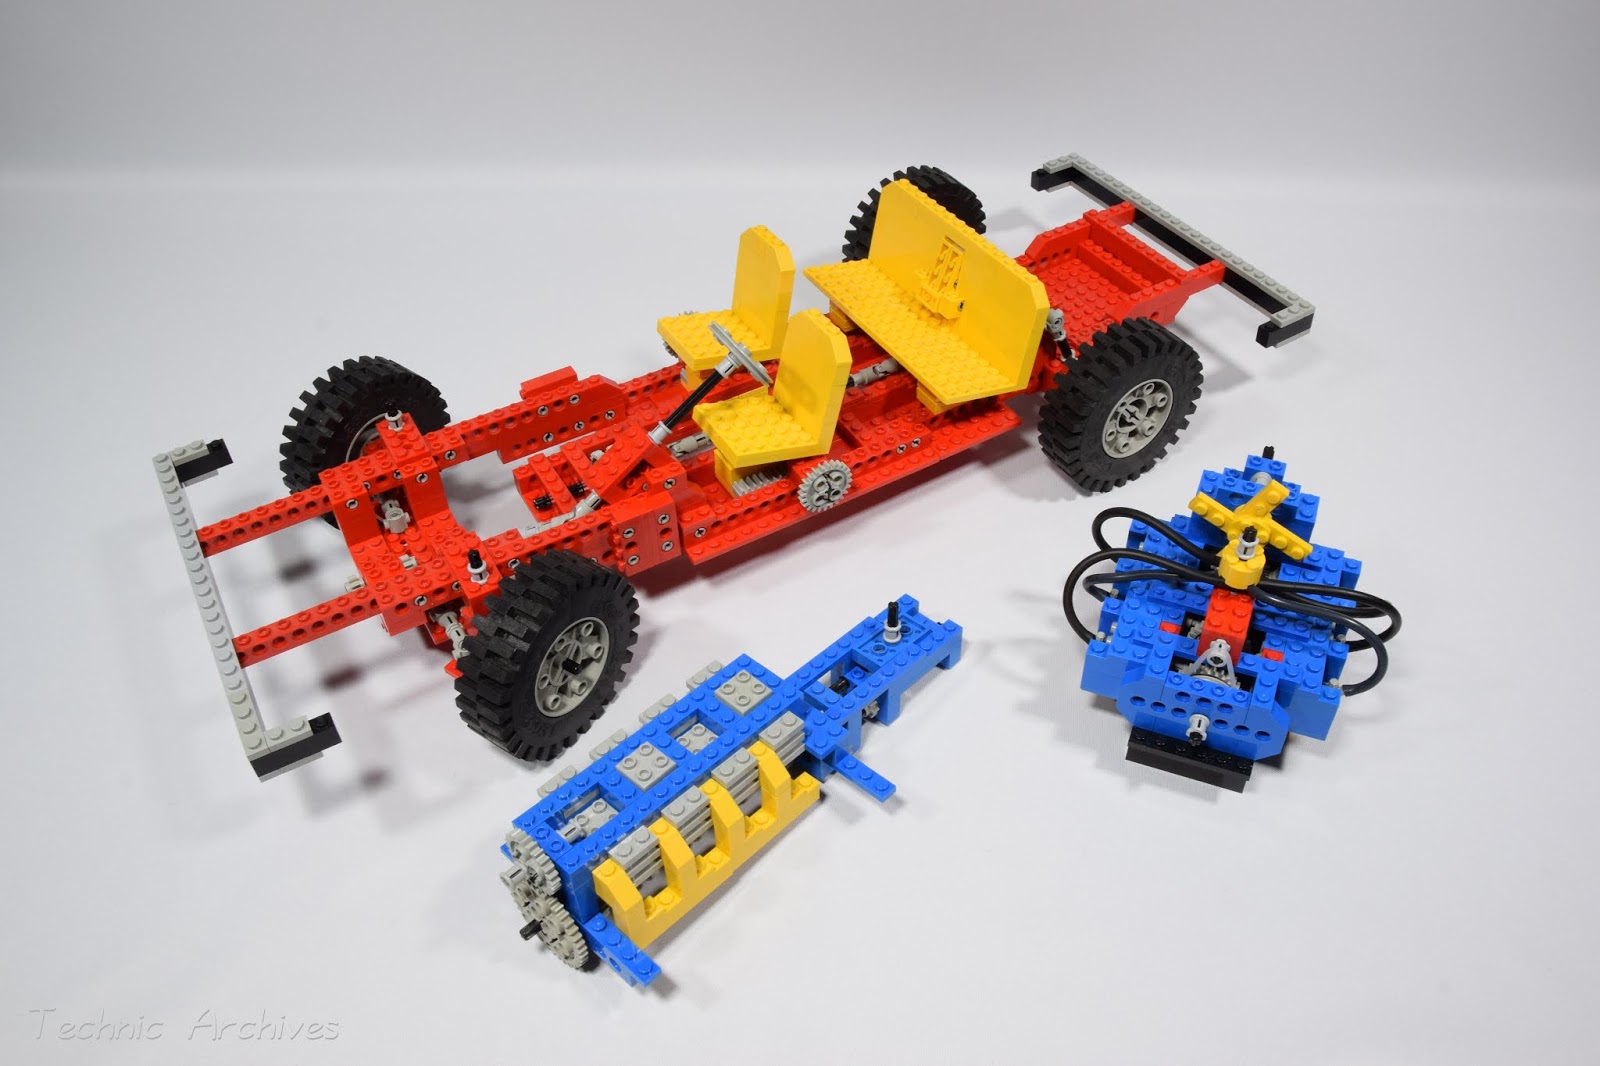
The model features the chassis of a 4 seater car and as the name suggests, there is no body of any sort. There is no other 4 seater Technic car to date.
In the front, there is a 4 cylinder inline reciprocating engine, with a built in transmission. The car is rear-wheel driven and it has enough space in the back to serve as a luggage compartment.
The model is huge, though it's rather long than wide. With it’s 602 pieces, today it would be only a medium sized set, but back in it’s time, it was the biggest Technic set by far.
The original tv commersial
Functions and build
Comparing to a modern Technic set this car doesn’t seem to be overly interesting functionality-wise, but in its own right it is indeed interesting. This was the very first Lego vehicle to employ a reciprocating engine. It is apparent, that the developers at Lego wanted to stay as close to the classic bricks as possible: the piston is a modified 2x2 brick into which an axle-pin connector can be snapped. The “cylinder” is in fact a square-based column, built from 1x2 and 1x4 plates. The round pistons and cylinder elements were released only in 1990.
Building the engine is a game of patience. During the assembly of the crankshaft, loose beams keeps falling off on one side, and pistons on the others. Also, fitting the crankshaft into the cylinders is challenging nontheless: one has to convince all four piston rods to stay in the exact middle of their respective 4 unit long axles, while still balancing the loose beams.


Furthermore this was the very first Lego vehicle to feature a working transmission of any kind, albeit it only has only 2 gears. It’s a rather simple thing: the engine drives 2 axles but at different speeds, because of the gear train. There is a third axle in the middle, which is connected to the rear axle (and thus the real wheels). Pushing the gear stick forward will connect the third axle to the axle turning slower, pulling it back connects it to the axle turning faster. The gear ratio is 3:1 and 9:1; that basically means, there is a gear in which it’s easy to push the car around (the engine rotates rather slowly) and there is a faster gear that only works is the car is built properly. Any mistake will show instantly as the engine will stall and the rear wheels will slip.
Changing gears isn't easy sometimes, because the cogs must be aligned perfectly to engage, and the transmission is not synchronised. The first synchronised transmission will be released in 8880 in the early 90-es.
The car is rear wheel driven, there is a cardan shaft along the length of the car, torque is transmitted by a crown gear to the real axle. There was no differential back then, which can be viewed as an advantage or a disadvantage, depending how you view it. It’s good, because it shows why a differential is needed in a real car: it’s easy to spot as the outer wheel stalls for an instant while car is turning. On the other hand, it’s not that comfortable to push the car around for the very same reason.
When I built the car for the first time, I didn’t understood why there are so many universal joints in this set. Then I learnt, that back then there was no other piece to join two axles together (they were released in 1993). Apparently it was more economic to use universal joints, even if it was not needed for the axles to be in an angle, than to produce a new mould for a connecting element, for more than 15 years.
There were no shock absorbers back then either, but there is a conventional 4 stud long axle in their place, on the back of the car. Shock absorbers, with a spring, appeared in the next supercar: 8860 (released in 1980).
The seats are reclinable, both at the front and at the back. The first seats are even adjustable fore and back, by the turn of a gear. The rear seat features an armrest which can be tilted up, but then it would still be very uncomfortable for the 5th passenger, as it would still be pressed hard into his back.
The steering assembly is almost completely made of System bricks. The pivot points are made of 2x2 turntables, which makes the steering assembly a bit cumbersome, at least compared to modern sets. It has an Ackermann geometry, which means, that the wheels are travelling on a different arc. Unfortunately most of the modern sets does not employ this.
All in all it’s true for the whole car: the structure employs a lot of System bricks. The chassis is made of 1 layer of plates and on top of it, one layer of beams, meaning it’s not very stiff.
The building instructions leaflet has only 16 steps for the A model, but the different modules (steering, engine and transmission, seats) has their own numbered steps. There is a bit of an inconsistency as not every modul states what pieces are put on the model at the current step.
Structural rigidity during the build (and in some cases, even after finishing it) was not a concern for the designers. There are steps when pieces are only connected to each other on a single stud, and they keep falling off as new pieces are added.
In the first two year of production, the building instructions were a single fold-out sheet. On one page there was a 1:1 scale blueprint of the model, the step by step building instructions on the reverse side. From 1979 every set came with building instructions in a booklet form, and the blueprints were gone, thus they are rather rare and expensive now. Unfortunately I do not possess the instruction in any form, so I was only able to get an image of the blueprint from the internet.

Motorisation
There are instructions (more like 3 photos) to motorise the car with the addition of an electric motor. The motor is built on the front bumper, to drive the reciprocating engine. It’s an odd choice, as there is plenty room in the back of the car, but I guess it was a major design goal to drive the car form the engine, like a real car does.
The battery holder is has a lever, which changes the polarity, thus determining the direction in which the electric motor rotates. The motor drives the crankshaft directly, so if something is stuck, then the motor stalls (and is prone to burn down). Later, when the 4.5V motors were replaced by the 9V ones, torque was transmitted by a rubber band instead of direct drive. When Power Functions came along, the clutch gear was released.


Body
At the front of every building instructions booklet released after 1979, there were inspirational images of other models, which could be built from Technic bricks. On the cover there was an image of a 853 with a yellow body. There were 3 additional images of it in an inner page, which stated that the body could be built using the 852 Helicopter set and the 871 supplemental set. Step by step building instructions were never released for it, and I could not find any user made instructions on the internet either. Furthermore, there were no high resolution images of the body to be found. So I bought one of the booklets to examine the images it provided. It took me almost a month to reverse engineer it. I literally took a magnifying glass and counted studs on the pictures. The hardest part was to figure out, how to connect the front of the body to the chassis.
I believe though, that it cannot be built as it is presented on the images: there are only 5 pieces of yellow 1x4 plates but the image shows 6; also there are only 2 pcs of 1x2 yellow plates while 4 is needed, so I had to improvise here and there. I tried to make it as close to the original as I could, but bear in my: this is my interpretation of the car with yellow body, it's not the original one.


The kickstand of the hood does not fit when the hood is closed down (it hits the tyre). The smaller cog must be stripped of the engine front in order to install the grille.
858 Boxer engine
Curiously, there is an image in the building instruction booklet of the 858 Auto Engines set, which features the 853 A model, with a 6 cylinder boxer engine (one of the models of the 858 set) in the trunk. With the boxer engine, the 853 becomes the 4 seater version of the second supercar 8860, which was also released in the same year as the 858 Auto Engines set: 1980. It’s nice to see, that the designers were still “supporting” the older set.
The boxer engine connects directly to the crown gear at the rear axle. Because the in-line 4 engine is practically a separate module, it’s easy to remove from the front of the car. There is no transmission connected to the boxer engine, though.


Body and Boxer engine
Curiously there is enough space for the boxer engine even when the body is built. The original engine can be left in place, because the two engines can work simultaneously.


Play value
This model is huge, which somewhat diminishes it’s play value. Despite the big steering lock, it take a lot of Y maneuvers to turn around in the living-room. On the other hand, the car has 4 seats, so a lot of minifigs could participate on an afternoon ride, and there is even free space for a picnic basket in the boot.
B model
There are step by step building instructions for a B model, which is a go-cart with a 2 cylinder in-line engine at the back.The scale is quite different from the A model, why the later is probably a 4 door saloon, the go-cart is a small wheelbase vehicle.
It’s structural rigidity is even worse than of the A model. When I tried to lift it from the ground by grabbing the bumper, it simple tore off. The bumpers on the A model are build right on top of the chassis, which made them rather sturdy.
The structure of the engine block suffers the same: the firewall is connected to the rest of the block by only 2 studs.


Not surprisingly the go-cart has even less functionality than the A model: there is no transmission at all, but at least there is working steering. Also the bonnet can be opened in order to examine the steering assembly.
The gear ratio of the steering (and the engine) is rather small. The steering wheel must be turned a lot in order to reach the maximal steering lock, but upon reaching it, the tyres are reaching both the chassis and the bumper.
I like the aesthetics: there are exhaust pipes on the engine and even a throttle and break pedal next to the steering column.

There is a single image in the building instructions for adding an electric motor to the B model as well. It is very important to remove the 12 teeth cog from the axle protruding behind the seat, and replace it with a bigger one, unless you want to stall the motor. I guess the designer went with this solution, because a bigger cog would not fit behind the seat.
C models
Back then, there were a lot of images on the box to inspire builders to compose other models, but there never were building instructions for them. These models probably have even less functionality than the B model, but because of the lack of instruction, everyone is free to improve on them.
I confess that I cheated: I downloaded the instructions from rebrickable for the C models. I had to modified them a bit, in order to build them using only the part from this set (and no additional parts at all). I didn’t had another choice, because I could not find any high-res images to reverse engineer from, and I do not own the box for my set.
None of the C models have much actual play value, as they are all short of functions, fragile, and rather big.
Lathe
The axle of the lathe is longer than 12 studs, and one of the rims are used to connect it to a 4 studs long axle. The rim also acts as a flywheel. The fastening point on the other end of the axle is adjustable, but I’m not sure what’s the purpose of it. The position of the milling blade is adjustable too.
The gear ratio is rather big, as the axle rotates quickly, and it keeps it’s momentum because of the flywheel.


Dragster
Long and thin, as a dragster should be. But the structure weak, again: it’s prone to sagging in the middle. The front wheels are represented by a pair of naked rims. It would have been unreasonable to supply a pair wheels in a different size, just for the sake of a C model.
There is no steering whatsoever, which is understandable, given the size of the steering assembly in the A model.
The most interesting feature is the V4 engine, as this is the first Lego vehicle of any kind to have one. The later supercar, 8865 is going to employ a very similar engine.


Truck
Similarly to the other models, the truck is rear wheel driven. It has a 2 cylinder in-line reciprocating engine, without a transmission. The cabin can be tilted forward, to reveal the engine beneath it. Because the seat is connected to the cabin itself, it’s rather heavy. The structure barely holds itself when tilted forward. The model is nose heavy as almost all of the bricks are sitting over the front axle, the back wheels are prone to slipping.
In my implementation there is no steering. Maybe it can be done using nothing more than the pieces of this set, but it’s difficult, as there is not much room next to the engine.
The structure is fragile to say the least. The front bumper is only held by 2 studs altogether. Lifting the vehicle up is only possibly by reaching under it.
Because of the lack of steering and overall fragility, it’s almost completely unsuited for actual play.


Jeep
This model has a 4 cylinder in-line engine, very similar to that of the A model’s, but there is no transmission. Also no steering (at least in my implementation), but I guess it would be the least difficult to add a steering assembly to this car, among the C models. Like all of the others, this car has rear wheel drive too. There is even considerable place to implement a transmission, but there are almost no bricks left over. The aesthetic are nice, as there are even windscreen wipers!


Scissor lift
A rather simple construct, but it works surprisingly well. The length of the lift-bed limits how much is it able to collapse. Adding other pieces could improve the travel of the scissor arms. A simple ratchet prevent the lift-bed to fall back. The structure is strong enough to lift 4 heavy wheels.


Impressions
I wasn’t even alive when this set was released, so I have no memories of ever seeing it in catalogues. When I first decided which Technic sets I’d like to have, at the age of 5, even it’s descendant 8860 was already out of production years ago. Despite that, this car is special to me: when I first decided that I’d like to collect all Technic supercars, it seemed to be out of reach for me. The price of an original 1977 set is way too high. Then after accumulating some sets, and ordering missing or broken pieces, I decided to gather this set brick by brick.
There are no special parts in it, only the most common Technic and System bricks. Even the big wheels are easy to come by. It was exciting to go to the local second hand Lego market, keeping a list of the missing pieces, searching the internet for harder to come by pieces, and it was really satisfying to finally build the car.
Of course, this way I don’t have neither the box or the building instructions (which both are very expensive), but at least I can build any of the models!
Rare parts
Uncommon parts are: the piston bricks, the big, 40 teeth cogs, the hinges for the seats, the 6x16 plates and the big 24x43 wheels. The tyres where made of some kind of soft plastic foam, rather than the much smaller rubber ones, with which i was familiar with. But all of these could still be bought on bricklink for a reasonable price.

These early sets did not contain much parts prone to break. The only two elements could be problematic: the axle-pin connector and the universal joint. Both can break on the axle end. They are available on bricklink despite that neither of them are in production. Also bushes occasionally break, but they are among the most common parts, so are very easy to replace.
Summary
Compared to modern sets, 853 is way too big for what it does, but it was revolutionary when it was released. It literally started not only the supercar series but Technic itself.
It’s definitely not something I would play with everyday, but it’s interesting to see what it was at the dawn of the Technic sub-theme. The fact that it’s not at all hard to collect piece by piece only makes it more valuable in my opinion. Get it while you can!
A great review of one of the best old-school technic models!
ReplyDeleteI have also tried to build the body of the chassis via internet research last winter, unfortunately, as mentioned, you can only find poorly resolved pictures...
But i have also my own interpretation of the body! :-)
For the sake of completeness, there have been two different variants of the motorised engine.
One, which was implemented here, was in the building instructions of the main set. The other was an idea which was included in the 870 engine kit.
Here are the pictures of the different variants:
http://www.moritz-hummel.de/Lego%20853%20Motorantrieb%20offiziell.JPG
http://belay.peeron.com/scans/853-1/13/
Oh, I missed that there was another official way of installing an electric motor, thank you for the additional information on this set.
DeleteI've tried to make a review as complete and thorough of this set as I could manage.
But there is something else missing . After publishing it, I've found something interesting on bricklink: somebody managed to get hold of some images of the pre-production prototype, in this thread:
https://www.bricklink.com/messageThread.asp?ID=216764
The most interesting image, I think is this:
https://www.bricklink.com/myImg/371550.jpg
It's very fascinated how the (possibly first ever) Lego steering evolved during pre-production.
Thank you for posting the pictures of the chassis with the additional frame/bodywork. I remember as a child attempting this, using the forklift set and unfortunately having to give up. More recently I acquired the Helicopter set, with this, some spare plates and beams, your photos and a Lockdown (thanks Coronavirus) I have finally gotten round to it, 43 years later!
ReplyDeleteYou are welcome! It took me about a month to kind of get it work. The. I realised that I haven't even included all the pieces from the helicopter:) Anyway it was fun to build.
DeleteIt was my intention to have high resolution pictures if anyone wants to build it. Glad that I could be of help!
This comment has been removed by the author.
ReplyDelete